BOOST BOTTLE for a 700 TRIPLE
and INSTALLATION INSTRUCTIONS
Parts needed Yamaha:
SRX Style offset steering arm or shim your motor up as stated below
SX500 style carb boots part # 8CR-13555-00-00
Boost Bottle retainers part# 90467-24096-00
Drawings of parts needed to make:
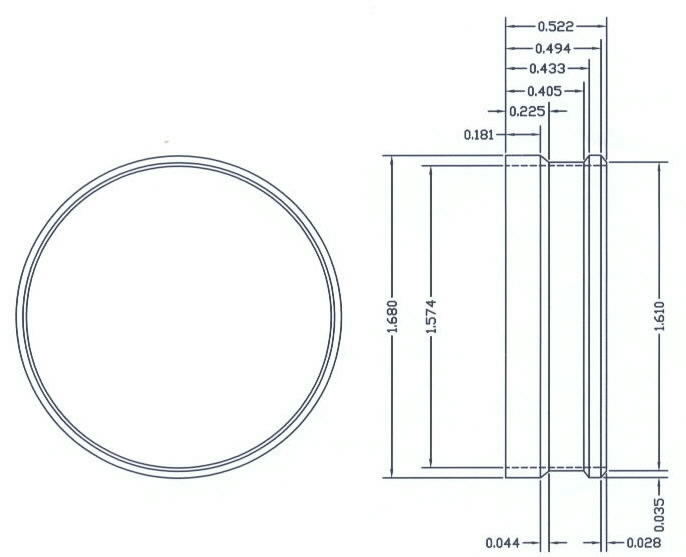
Machine pressed Carb Rings to change carb bell to new boot size
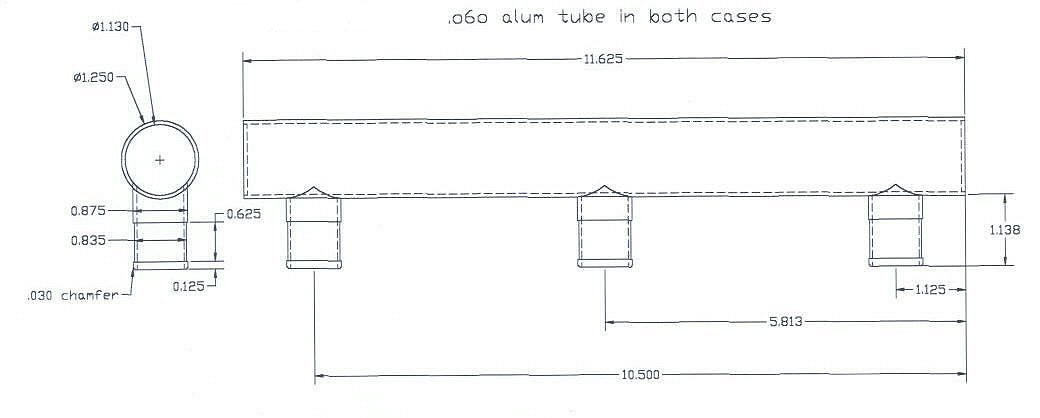
Machine and welded boost tube
Boost Bottle Kits increase the bottom end of your power band by 8-10 HP
at steady throttle by bringing up torque and horsepower sooner in the RPM range, it was not designed to add to peak
horsepower but shows 3 to 4 hp on the dyno.
1. Remove airbox, coils, carbs, intake manifolds and reed blocks use rags to keep
from dropping anything in the motor (don't forget to take them out, it's
happened).
2. Install reed spacers and gaskets then reed blocks then intake manifolds.
Make sure all gaskets seal correctly and there are no air leeks. Do not over
tighten manifold bolts.
3. Lube intake manifold portion of feed tubes with Yamalube oil.
4. Slide boost bottle clamps onto the feed tubes of bottle itself.
5. Slide feed tubes of bottle into feed tubes of manifolds while holding
clamps onto bottle then secure clamps over feed tubes of manifold.
6. Use Yamabond #4 on the inside of machined press fit rings to insure there
are no air leaks prior to installation onto carbs.
7. Install machined press fit rings on carbs using small hammer and block of
wood so you don't nick the edges of the rings they are machined to very
tight tolerances. Tap on evenly until they are flush with throat of carbs.
Note: The Throttle Over Ride (TOR) Switch will need to moved. The switch slides in a fork using a zipcut and a grinder cut it off. Now in your hand you have a fork and a TOR switch , on the back of the switch is a little piece of plastic hanging off in the shape of a triangle cut it off with side cutters. you now slide the fork back into the switch, reinstall the switch 90 degrees from its original position as you can see now it is inline with the cylinders. You now weld the fork in its new position. Usually just tack weld it first than remove the switch and finish welding the fork, this is so you don't melt the switch. You can also just pull the switch flip it around and zip tie it in place if you don't want to do all the welding as stated above.
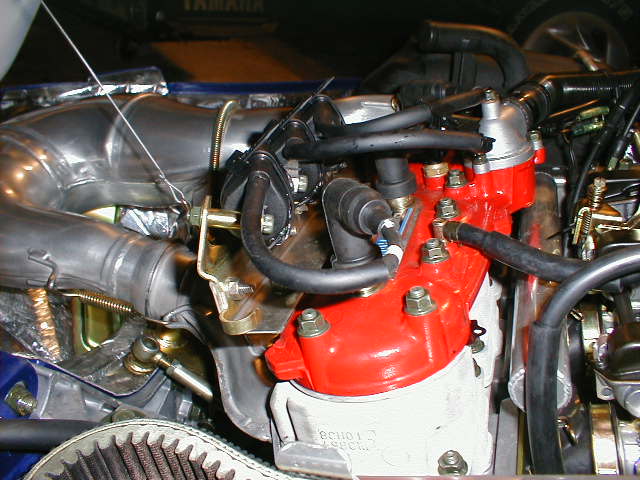
8. 2001 700 will need a bracket to install your coils off the head in a new location because the boost tube will now take up that area. See thumbnail below:
9. WARNING: Your center carb will hit the steering column because of the
large straight shape of the new manifolds (stock one's are offset). It will
wear through the corner of the float bowl and injury to personnel and
equipment could occur if the following changes aren't made.
(Tips) If your center carb hits use one or all the tips listed below.
9. Loosen all four motor mounts, place washers under rear motor mounts so
that the center carb will clear the steering column safely. NOTE: You can
also silicone *" rubber pads to the tunnel where the airbox contacts to
help
tip the carbs up and away from steering column when the airbox bolts are
tightened.
10. Move motor towards clutch side to help carb clear steering column.
Install new spacer over jackshaft behind driven clutch and re-align motor so
clutches will operate properly. Example: The clutch specifications for a
700-mountain max are 268-270mm center to center with 15-17mm offset. Torque
motor mount bolts to 29ft pounds
11. Install carbs, fuel lines, airbox, throttle cable, choke cable and
electrical connections to factory specifications. WARNING: Make sure there
are no fuel leaks and throttle works properly without binding before
operating engine.
Compliments of HARTMAN INC. for more info click there link.
Totallyamaha is not responsible for any damages that these modifications may
cause to your vehicle; any modifications are your responsibility if you choose
to do so. We are providing information ONLY. Some of these modifications may
VOID your warranty and that is your responsibility to look into. The
Totallyamaha users have passed along most of the information found on this site.
If you have any questions or concerns about anything on this site talk to your
dealer before using any of the information. Totallyamaha will not be liable for
any damages or personal injury from any modification performed from this site.
![]()