|
 Everyone has had it, that heart stopping moment when you think
you have stripped out a thread and you’re wondering to yourself, "What
the hell do I do now?" For me it was the thread on the sub-frame
for one of the four bolts that hold the rear fender in place, I stripped
that puppy good. Because of this I was looking down the barrel of
well over a $100 for a second hand sub-frame or who knows how much for a
new one! But thankfully that was when I remembered hearing about Helicoil
kits. Read on, if you will, as it might just save you a LOT of money
someday and no end of anguish. Everyone has had it, that heart stopping moment when you think
you have stripped out a thread and you’re wondering to yourself, "What
the hell do I do now?" For me it was the thread on the sub-frame
for one of the four bolts that hold the rear fender in place, I stripped
that puppy good. Because of this I was looking down the barrel of
well over a $100 for a second hand sub-frame or who knows how much for a
new one! But thankfully that was when I remembered hearing about Helicoil
kits. Read on, if you will, as it might just save you a LOT of money
someday and no end of anguish.
Experienced wrenches and even some home tinkerers will be familiar with Helicoils,
and if you are then you have probably had to use them in the application
they were design for, which is creating a new thread for your bolts to grip
onto. If you haven't heard of them then this article attempts to show
you how easy they are to use and how they can save you a lot of
money. To give you the short version, a Helicoil kit will allow you
to drill out a stripped bolt hole, tap a new thread into the larger hole,
where you then wind in the Helicoil that in turn becomes the new
"thread" for your bolts. Helicoils are also typically
stronger than the metal you are putting them into, so chances of stripping
out the thread again are just about zilch.
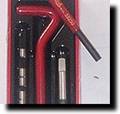
Basically
a Helicoil kit usually consists of a number of Helicoils (duh), thread tap,
and a couple of tools to put the kit in. Sometimes they will include
the drill bit that you need, but you may have to buy it separately.
If you do have to buy the drill bit separately make sure you buy EXACTLY
the size that your kit requires. One measurement too big or too small and
it is useless. Oh and be sure to buy a drill bit that is for drilling
metal, don't try and save money on a wood drill bit, it just isn't worth 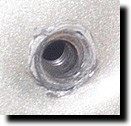 it. it.
Now I'd had problems in the past when a misaligned bolt
stripped some of the thread of my fender sub-frame (because I like
to swap between solo and two-up a lot) although I was able to save it at
the time just by re-tapping the hole. It was when I was putting on a
new set of saddle bags that I stripped out the hole completely and the
weight of the bags (Tour Classics) meant I had to fix the problem without
delay. For the record, the size Helicoil kit I used was M8-1.25
(matches the bolt type for that area) and the drill to match this kit is a 21/64
hi speed bit. If the drill bit isn't included in the kit
and the size required isn't written anywhere then ASK which one you need,
don't ASSUME!
 So the first thing you have to do is to drill out the
hole, just make sure you have the drill as straight as possible. The
drill bit for my kit was 21/64 in size so it left me with a
perfectly flush hole with no sign of the old thread. Thankfully I was
able to leave my fender in place for the job as it meant less stuffing
around. So the first thing you have to do is to drill out the
hole, just make sure you have the drill as straight as possible. The
drill bit for my kit was 21/64 in size so it left me with a
perfectly flush hole with no sign of the old thread. Thankfully I was
able to leave my fender in place for the job as it meant less stuffing
around.
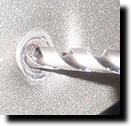
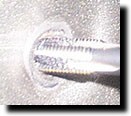
Next you have to tap a new thread using the tap that
comes with the kit. The tap is tapered at the front end to help you
get the thread started and using a shifter you wind it through the
hole. Make sure you wind it all the way through until you stop
feeling "resistance" as this means the hole is now completely
tapped with the new thread. Gently wind out the tap with the shifter
and when you do you shouldn't feel any resistance; in fact you may even be
able to twist it out with your fingers.
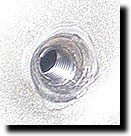
Now you
get one of the Helicoils and using the tool supplied you wind it into the
new thread until it is flush with the frame (sorry no picture). You
also shouldn't feel any resistance as you do this but if you do you may
just need to clean the thread up a little. It is also at this point
why the drill bit size is so important, as the outer thread of the Helicoil
will match the newly tapped hole, the inner thread of the Helicoil will
match your bolt size.
Once the coil is in place you use the little punch that
should come with the kit to knock the little tang off the end of the Helicoil
that assisted with winding it in. Don't try to twist this off (unless
the instructions say to) as you may warp the Helicoil and you don't want to
do that.
And now
you’re finished so all that is left is to put the bike back together!
Because it was so simple I decided to drill out the other three holes in my
sub-frame and put Helicoils in all of them. As mentioned earlier the Helicoils
are usually a lot stronger than the metal they are put into so hopefully I
am going to avoid the problem happening again down the road.
  Hopefully this
write-up will make you more confident in using a Helicoil kit if you are
ever unfortunate enough to need to utilize one. Hopefully this
write-up will make you more confident in using a Helicoil kit if you are
ever unfortunate enough to need to utilize one.
|


