Jetting a
sled and reading plugs, piston wash by MrViper700
How to Jet
a snowmobile and read the plugs and piston wash:
This is another example of something that people ask for all the time and is
quite easy for them to do. When jetting a sled you’re going to be working in
steps, first will be the low speed circuit, this involves the pilot jet and the
fuel screw settings.
1.) Low speed circuits: With the correct pilot jet and fuel screw settings the
sled will smoothly gain rpm and not cough back thru the carbs or backfire thru
the exhaust, it will cleanly gain rpm from a dead hit off idle.
A.)Too much pilot jet will result in overly rich idle, fouling plugs and
"wet" looking plugs. The piston top will be washed clean of carbon
and be a new like silver color. Anytime you clutch a sled very aggressively and
or make motor mods you most likely will need to richen up the low speed
circuits, this can be from simply turning out the fuel screws more or bumping
up the pilot jet size. Again you’re looking for good clean stable idle and dry
plugs.
(Rule of thumb)- if you need more than 2 turns out on the fuel screws to have a
stable idle speed and smooth rpm gain, you need to bump up to the next biggest
pilot jet.
2.) Needles: This next step will be where you need to ride the sled for a
distance, because the carb circuits all overlap and it takes a bit of distance
to get the circuit you want to tune to be free of the overlapping circuits. The
needles are where most all people tend to overlook, it’s also one of the
biggest reasons why people burn down their newly piped viper, big bore
srx/viper engines, modded engines etc. The needle circuit overlaps with your
low speed circuit we discussed above, it controls from 3/8-5/8 throttle
settings, your mid range cruising speeds.
To check your needle circuit you need to take the sled to an open field and run
it at half throttle for a good 500-600ft, steady throttle and then with your
left hand, reach over your hand holding the throttle open and hit the kill
switch. Keep the throttle at the same exact opening till sled coast to a stop.
Remove the plugs and observe the burn on the electrode, ground strap and porcelain
insulator, then observe the piston dome, it should be somewhat dry, slightly
black/brown appearing and have no signs of detonation on the edge (little pick
marks)
Needle tuning tip: There are 2 little white plastic washers in your carbs,
these will stick to the slide and to the mounting block, so be careful to not
lose them or neglect installing them correctly. They will allow you to place
the needle in a half clip spot, by either shimming under the clip or on top of
the clip, this allows you to super fine tune the needle settings for crisp
performance and perfect mixtures.
3.) Main jet circuit: Lastly you’ll need to adjust your main jet size, this jet
is what everyone thinks can keep an engine from blowing up but actually the
needle is far more important in a trail sled where steady speeds(midrange) are
held for long periods of time, so don’t skip the needle!!!
This jet controls the 3/4-wide open throttle settings, it is responsible for
the coloring of the piston/plug on long runs over 600-700ft, you won’t be
completely on the main jet till after 500ft, the carb circuits all overlap and
it takes a bit to get completely on the main. The pilot jet you tuned earlier
also does contribute to a small 2-3% total fuel flow even at wide-open. I have
posted pics below to show you different piston tops to help guide you on the
coloring of them and what a sparkplug should look like if you get all 3
circuits tuned in perfect. I also will add some pics of different plugs as I do
tuning here in the field to show you so check back to see more plug pics in
various stages.
In closing there is actually allot more things to look for in a finely tuned
race sled or if you want to be at your best for the weekend grudge match on the
lake. There is a hidden indicator that you can look at if you happen to be freshening
up your engine, if you look to the underside of the piston dome you’ll see an
indicator of how well you have jetted your engine overtime. The perfect looking
underside dome will be a dark Hershey bar brown and about the size of a dime or
nickel, this means you have the optimum mixture and temp in the piston to make
good power. If it’s large and filling entire dome top and flakey black it’s too
rich and also too rich in the way of oil/fuel ratio. If you see the underside
is a grey/whiteish color and dry, it’s called "death ash", you can
guess as to how it got its name, this will be shown in a blown up seized engine
on a lake run.
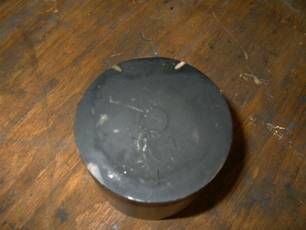
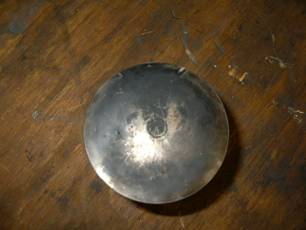
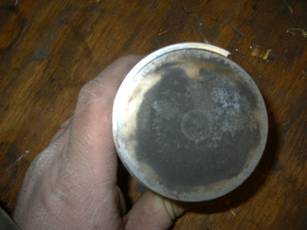
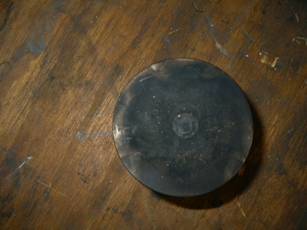
If you place your cursor over the pic, it will identify the number:
Pic# 33= Good wash, very good overall jetted trail riding piston
Pic #34= slightly lean, you can see the dryness and the piston top wont color
its whole surface, this is where the sled will feel "flat" just like
its making noise and not gaining speed.
Pic #35-Detonation starting, the pic is bad or you’d also be able to see the
spotting on the ring lands, its best described as looking like you washed your
car and the sun made water spots on it, the ring tops will look just like
spotted car, this is the first sign of too lean. The edge of the piston also
gets a small picked looking appearance to it; best described as little ice pick
indentations on the squish band edge of the piston, too low of octane and or
lean jetting contribute to this.
Pic #36- Too much oil and rich, too much carbon build up top and little wash
marks(clean spots from swirl of transfer ports on dome edges), You can’t tell
from the pic but the carbon has begun to stack up in the dome, layered effect.
This is usually how a stock jetted sled will appear. A piston can be even more rich
than this but will be a wet, silver color (none). This piston is as close to a
stocker as I had on hand to show an example. It’s not the most prime example
but a pretty close one.
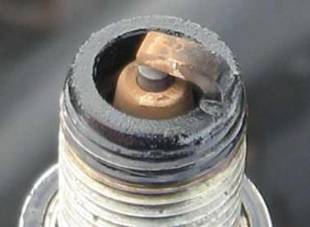
Spark
plugs
sparkplug
observation: there’s 2 pics here, (LEFT) is a right on the money spot on
jetting, but this would leave you not very much room if there were a temp drop
in the night, but you can clearly see the center electrode of the plug silver
across the tip, the ground strap is burned halfway back into the curve, the porcelain
has a nice brown finish to it, if the plug would have been newer instead of a
used plug you’d see the porcelain white with a "smoke ring" about
half the way down it, this means you’re in the sweet spot! Also, if you’re
running octane booster it will show up on the porcelain with a rusty red
finish! Race gas will make the plugs a dull grey color and very hard to read, that’s
why you’d need to cut the race gas with some pump gas to get some
"coloring" on the plug to be able to accurately read it.
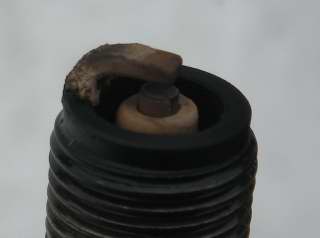
The other pic (right) is of a trail friendly plug with a small bit of safety in
there for a temp drop at night. If the same characteristics from the spot on
plug are seen but the center electrode core is just silver on the outside edge,
with a darker to black center on it, you have a little bit of safety margin in
there, this is a excellent trail sparkplug and will yield excellent power from
the sled. The first plug is what I would want when I am racing. (Remember the
center will be more white if a NEW sparkplug is used then an old trail ridden
one)
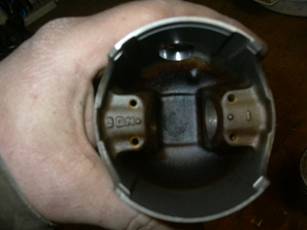
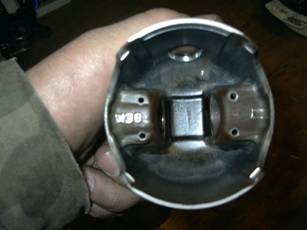
Inside
the piston dome
This is
the hidden indicator of how well your tuned in! Small sized brownish spot,
means very good tune-(right pic), a large amount of coloring, black, and flakey
means rich and too much oil as well(left pic). (Move your cursor over pic to
identify the number)
Different oils can affect this though, yamalube will burn black and bone dry,
synthetic oils will be more wet and brown in color.
Totallyamaha is not responsible for any damages that these modifications may cause to your vehicle; any modifications are your responsibility if you choose to do so. We are providing information ONLY. Some of these modifications may VOID your warranty and that is your responsibility to look into. The Totallyamaha users have passed along most of the information found on this site. If you have any questions or concerns about anything on this site talk to your dealer before using any of the information. Totallyamaha will not be liable for any damages or personal injury from any modification performed from this site.
![]()