Setting
Your Power Valves
I’ve been asked to move a thread about adjusting Yamaha
power valves and decided that some of the info in other threads needed to be
included as well. I’ve done some copy
and pasting to come up with this summary for the Tech FAQ forum. These are all quotes from various TY members,
thanks for sharing the following info.
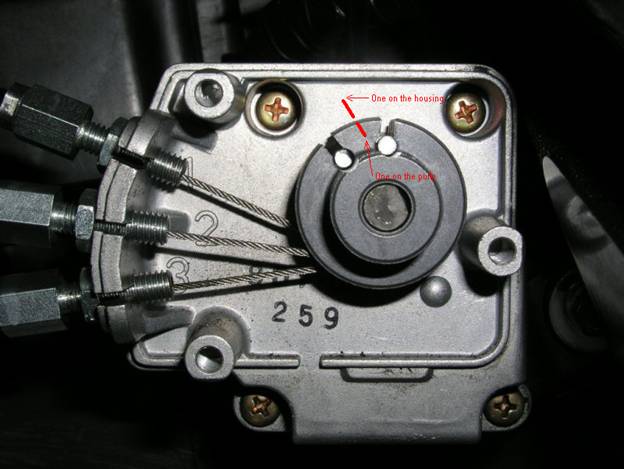
The TY Tech section has some images from a Yamaha service manual and the
procedure to service the power valves if you have the wiring pigtail. http://www.totallyamaha.com/snowmobiles/aaTECH/YPVS/YPVS.htm and
another member thread with additional pictures here: http://www.totallyamaha.net/forums/showthread.php?t=55625
Alternate service Method:
1.
Set servo (lower idle below 900 RPM, not
necessary on Viper ER's, just turn the key on), then make alignment marks on
the servo (helps later if it moves on you).
2.
loosen the cables all the way up @ the
servo cable adjusters
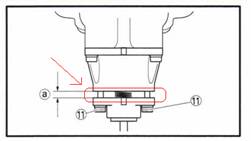
3.
loosen the two Allen bolts #11 @ the power
valve housing and pull it back
4.
Insert the 2.5mm Allen wrench’s (or other
suitable spacer), go back up to the servo and GENTLY tighten the cable
adjusters so it pulls the two P/V housings together, so it just touches the
wrench (chosen spacer), then pull out wrench and tighten the two bolts and the
cable adjuster lock nut.
5.
re-peat on the other two cables


Question #1
On a Viper ER, am I correct that I do not need the engine
running, but just turn the key on, and then follow the procedure? Do I need to
remove the servo cover at all?
Answer #1
Yes you are correct
on the ER because it has a battery already the servo has power available.
And yes I would pull off the cove to make sure it cycled.
Question #2
so are you saying to
set them the Yamaha way or set them by pulling the pipes off.....I like the way
of setting them the Yamaha way
much quicker and easier to do.....any difference between the 2
Answer #2
The Yamaha method that’s
in the service manual takes about a 1/4 of the time and it is correct as to the
valve placement in the cylinder
when opened. It adjusts the valve
perfectly and the exhaust port opening roof is raised, that’s where your power increase is from not the short
end of the bevel being flush on the exhaust roof, although the Yamaha method
will put the valve in perfect
adjustment. I have been doing them this way since 1998, to each their own. I don’t
have cables pulled thru the ends, never been a problem for me doing it this
way, with the other way you are pulling the cable back further then needed and
it does tug the valve against
the return spring more, this applies more pressure to the cable end inside the power
valve tip.
If you feel the need to waste a good hour of your time, take off the manifolds
and pipes and all and reach up in there and do it, I like to spend 15 minutes
and have the job complete and be out riding, but that’s just me. I follow the
book as it’s twice as easy and it works for me.
Make your own decision and do whatever way you feel like is the right way to
you!
Totallyamaha is not responsible for any damages that these modifications may cause to your vehicle; any modifications are your responsibility if you choose to do so. We are providing information ONLY. Some of these modifications may VOID your warranty and that is your responsibility to look into. The Totallyamaha users have passed along most of the information found on this site. If you have any questions or concerns about anything on this site talk to your dealer before using any of the information. Totallyamaha will not be liable for any damages or personal injury from any modification performed from this site.
![]()