CHANGING
YOUR SLIDES (Hyfax)
I will explain the best I can the 2 ways to change your slides (hyfax) WITHOUT pulling the rear suspensions.
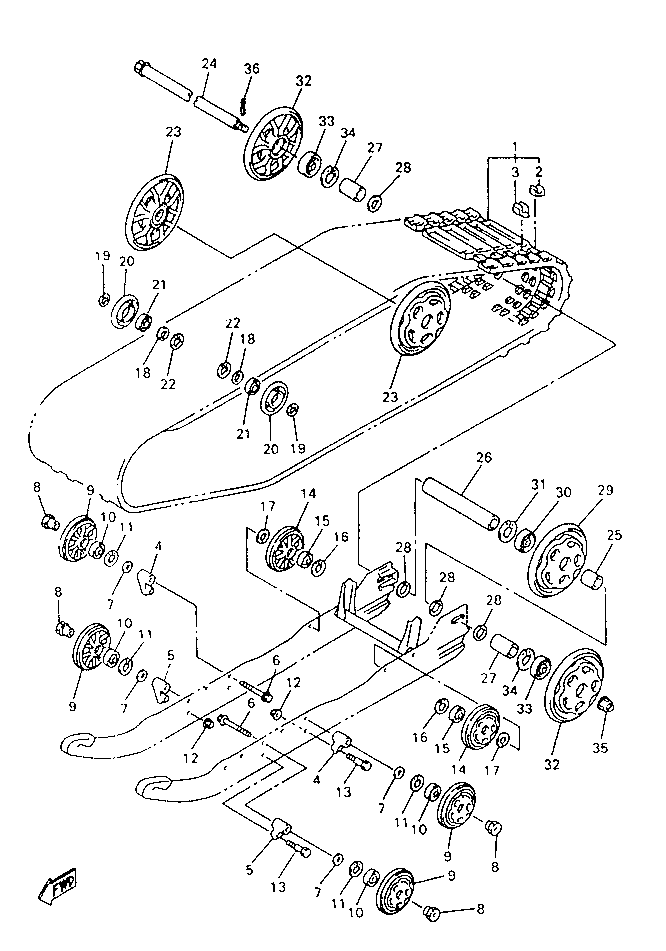
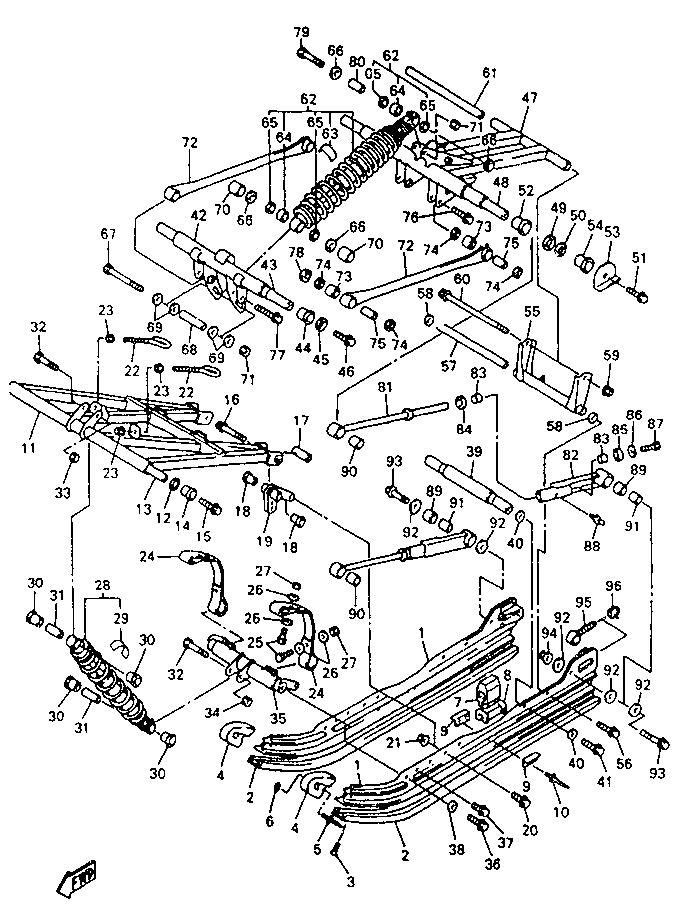
Slide Method 1: Need to loosen the track by using a 17 mm and 15 mm wrench on the back axel (Pic 1 #35 & 24) to crack loose the tension on the wheels that in turn hold the adjusters tight. Then take 14mm deep well socket and ratchet and loosen the track adjusters (Pic 2 #95) through the windows in the track counting your revolution to aid you in retightening the track later. After the track is loose, remove the Phillips screws (pic2 #3) from the front of the hyfax that holds the hyfax from sliding backs. These are some times pretty tight but be sure to use the right screw driver tip so as not to strip the screw tip out. Once the front screws are out you can slide the hyfax out the rear of the suspension thru the track window. If the hyfax are tight you can try using a flat screw driver to drive into the side of them with a hammer to aid in pushing them out the back. If they do not move then go to Method 2 highlighted area. If they do start to come then finish removing the hyfax in the same fashion as stated. Once hyfax are off you can then proceed to putting the new hyfax on. Before sliding the new hyfax on be sure to spray silicone spray or other non abrasive spray to assist you in sliding them on with ease. Watch hyfax carefully so they do not fall off the rail or get hooked at the bend of the rail on the suspension. Be sure to put the Phillips screws (pic2 #3) back in to hold the hyfax in place. After hyfax are installed proceed to retighten the track. Use spec in the your owners manual or tighten equally until the track can be pushed away at the rail bends slightly with aprox. 10 lbs of force. Turn sled on and run track to check for alignment. Be sure to retighten the rear axel bolt with the 17mm and 15 mm wrenches (Pic 1 #35 & 24) when complete with alignment.
See Pictures at bottom of page for Detailed Info
See Pictures at bottom of page for Detailed Info
Go to http://www.hlsm.com/ for more info on Yamaha Parts
Totallyamaha is not responsible for any damages that these modifications may cause to your vehicle; any modifications are your responsibility if you choose to do so. We are providing information ONLY. Some of these modifications may VOID your warranty and that is your responsibility to look into. The Totallyamaha users have passed along most of the information found on this site. If you have any questions or concerns about anything on this site talk to your dealer before using any of the information. Totallyamaha will not be liable for any damages or personal injury from any modification performed from this site.
![]()